Wednesday, September 28, 2016

Make Your Own Italian Eggplant Caponata
Still Looking For Progresso Caponata?

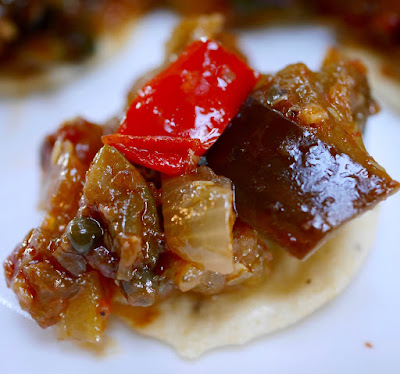
Eggplant Caponata makes a great appetizer.

Follow Foods For Long Life on Facebook and Pinterest.
Preview my eBook, Health Begins in the Kitchen.

Childhood Memories
Pretty much every holiday dinner in my family started with an antipasto. Occasionally, part of the antipasto was eggplant caponata. Even though my family made most things from scratch, the eggplant caponata was made by Progresso. 

Most prepared foods that come in cans is terrible. But I will tell you, those tiny little cans of Progresso Eggplant Caponata were wonderful, but unfortunately they are no longer available.

I hadn't eaten caponata for years. But last year, my girlfriend Margarite made a huge jar  for me. It immediately brought back childhood memories of this tasty dish. I devoured the entire jar and immediately planted eggplant in my garden.

My sister-in-law Dianne has fond memories of her aunt Vera's caponata and recently shared that recipe with me. There are things I like from Margarite's recipe and things I like from aunt Vera's. So I made a trial batch using the best of both recipes and it came out great!


Eggplant from my garden

Too Much Oil
The only unhealthy thing about caponata is the copious amounts of olive oil used in most recipes. Aunt Vera's recipe calls for 1 1/2 cups and Margarite's uses 1 cup. My brother Peter gave me a tip about microwaving the eggplant before frying that significantly reduces the amount of oil needed. Although I rarely use a microwave for anything other than heating up leftovers, I think this trick works very well and it allows me to reduce the amount of oil to less than 1/2 a cup. That still sounds like a lot but this recipe fills a 1 liter jar, lasts for a very long time in the refrigerator, and is used sparingly on crackers or baguette slices.

                    *                                    *                                    *

Eggplant Caponata Appetizer
Vegan, Dairy and Gluten Free
[Fills a 1 liter jar]

Ingredients
2 large or 3 medium eggplants
7 tablespoons extra virgin olive oil, divided
2 cups diced onion
4 stalks celery, diced
1 small red bell pepper, diced (~1/2 cup)
4 cloves garlic, minced
1/2 cup chopped pimento stuffed green olives
1/2 cup drained capers 
1 tablespoon pine nuts or walnuts, finely chopped
1 teaspoon salt
3/4 teaspoon black pepper
2 tablespoons sugar
1 (15-ounce) can tomato sauce 
1/4 cup water or as needed
1/2 cup red wine vinegar

Directions
Peel the eggplants, leaving on some of the peel. Cut into 1-inch cubes and place, in a single layer, on a microwavable plate covered with two layers of paper towels (you will have to do this in two batches.) Cover with a single layer of paper towels and cook in the microwave on high for 7 minutes. 

Microwave for 7 minutes

Heat 4 tablespoons of olive oil in a large enamel coated, non-stick skillet. Sauté the eggplant on moderate heat, turning occasionally, until tender and browned on all sides. Remove the eggplant from the skillet and set aside.

Add 2 tablespoons of olive oil to the skillet. Add the onions, celery, and bell pepper and cook on moderate heat until tender and golden brown, about 15 minutes. 


Add garlic, olives, capers, nuts, salt, pepper and sugar and cook, stirring, for several minutes. Stir in the tomato sauce and vinegar.


Stir in the cooked eggplant and cook, covered, until tender. Add a 1/4 cup or more of water if needed.


When the eggplant is tender, remove the cover and cook a few minutes until the water is completely evaporated. Stir in 1 more tablespoon of olive oil, and adjust salt and pepper to taste.

Cover and let the caponata sit in the pan for several hours to allow the flavors to develop.

Place in a 1-liter, air-tight jar and refrigerate until needed. 


Caponata will last for weeks in the refrigerator.

Serve at room temperature on gluten-free crackers or baguette slices. 


Tuesday, September 20, 2016

How To Cut A Tomato When You Only Need A Slice Or Two

Need a big juicy tomato slice for your sandwich? Try this!

Follow Foods For Long Life on Facebook and Pinterest.
Download my eBook, Health Begins in the Kitchen.

How to Cut a Tomato
This may seem ridiculously simple, but it's a little trick I use when I need a nice juicy slice or two of tomato for a sandwich or a veggie burger. This method does a few things:

* it gives you a big, center slice of tomato without messing with the blossom end or stem which doesn't make a good sandwich slice anyway

* it lets you store the rest of the tomato without the cut end touching the plastic wrap

* the left over tomato stays fresh in the refrigerator longer

Here we go!

Pick a big, juicy tomato.This bad boy came out of my garden - it's a pink Brandywine.

Slice to the left of the middle depending on how big a slice you want to end up with

Cut a slice or two

Place the remaining tomato top over the bottom.
It should fig snug.

Place in a baggy.
Don't worry, the open tomato won't touch the plastic.

Place the slice of tomato in your sandwich or on a burger.
Using a round, whole grain bun is perfect.
This is a hummus, cucumber, avocado and tomato sandwich.

Enjoy!

Tuesday, September 13, 2016

Results Of This Year's Corn Crop
Fresh Corn, Tomato And Cucumber Salad

Fresh corn makes a great salad topping.

Follow Foods For Long Life on Facebook and Pinterest.
Preview my eBook, Health Begins in the Kitchen!

Corn
I love corn. I love everything about it. I love to eat it raw, right off the cob. I love throwing it into soups, salads, muffins, well - you name it. But the thing I love the most is growing it. This year was our second crop and we actually harvested it on time at the peak of its tenderness (lessons learned from last year!)

Having grown up in apartments in New York City, where one is lucky to have a flower pot of parsley on the fire escape, the very thought of having enough land to grow such an enormous vegetable still blows my mind. My corn stands proudly in the entry to our little farm - a monument to a more sane life. 

Me and my daughter, Linda, playing in the corn.

Last year we planted 35 seeds and got about 48 ears of corn. This year I planted 65 seeds which yielded about 85 ears (hard to keep track as I kept eating them before accurately counting.) It looks like for each seed planted, I have gotten 1.3 to 1.4 times the ears of corn. If you google "how many ears of corn do you get from a plant", most experts say 1 to 2 ears. So my yield might be on the low side, but since it's heirloom corn, not GMO, it's naturally bred for flavor and sweetness, not high production.

Extra tender, midseason bicolor corn from Johnny's seeds.
We planted the end of May and harvested the end of August.

With all of this corn, we obviously had to freeze most of it. To freeze corn, see last year's post on Freezing Summer Corn for Winter Pleasure.


Sometimes corn can get lost when tossed in a salad so I often like to use it in a layered salad where it happily sits on top. I brought this salad to a pot luck last week where I was able to use the cucumbers, tomatoes, corn, and basil from my garden. Corn goes incredibly well with tomatoes, so you will be seeing them together in future recipes - stay tuned!

Drizzle this salad with a simple vinaigrette or your favorite dressing.

                *                                   *                                    *

Fresh Corn, Tomato, and Cucumber Salad
Raw Vegan, Dairy and Gluten Free
[makes 6 servings]

Ingredients
For the salad:
1 large English or other cucumber, peeled and sliced
1 large yellow heirloom tomato
1 large red heirloom tomato
Kernels from 1 large ear of non-GMO corn
2 tablespoons finely diced red onion
Handfull chopped fresh basil, chopped
Salt to taste
Freshly ground black pepper to taste

For the vinaigrette dressing:
1/4 cup extra virgin olive oil
3 tablespoons balsamic or red wine vinegar
1 large clove garlic, pressed
1/2 teaspoon dried oregano
Salt and pepper to taste

Directions
Layer the bottom of a salad bowl with the sliced cucumbers.

Slice the tomatoes and place in a colander to drain. If they are particularly juicy, lay them on paper towels. Once they are fairly dry, place them over the cucumbers. Sprinkle with salt and pepper and some of the basil.

Mix the corn kernels with the red onion and place over the tomatoes. Sprinkle with more basil and seasoning.

Cover and refrigerate until you serve. Right before serving, stir or shake the vinaigrette well and drizzle the amount desired evenly over the salad.

Enjoy!

Thursday, September 08, 2016

Delicata Squash Stuffed With Spicy Black Beans and Saffron Rice

Delicata squash makes a whole meal when
stuffed with spicy black beans and saffron rice.

Follow Foods For Long Life on Facebook and Pinterest.
Peek at my eBook, Health Begins in the Kitchen.

Delicata Squash
Delicata squash grow easily and I harvested about 2 dozen of them a few weeks ago. Although I usually just roast them with rosemary , lately I've been stuffing them with various things. Since Doug loves black beans, for lunch today I baked the delicata squash, made some saffron rice in my rice maker, heated up a can of spicy black beans with some fresh red bell peppers from my garden, and voila - a yummy, meat-free meal! 

Black beans are a great source of high quality protein, folate, thiamin and fiber. Here's the recipe!


                     *                               *                             *

Stuffed Delicata Squash
Vegan (if made with Earth Balance), Gluten Free
[makes 4 servings]

Ingredients
2 delicata squash
Earth Balance or ghee
Salt and pepper to taste
1 cup rice (Tamaki Haiga or short grain white rice)* 
Pinch of saffron
1 small organic red bell pepper, finely diced
1 (15-ounce) can organic spicy black beans

* Tamaki Haiga rice has the bran removed but still contains the germ. I call it "white rice without the guilt!"

Directions
Heat the oven to 350 degrees F.

Cut off the stem of the delicata squash and then cut in half vertically. Clean out the seeds.

Liberally spread Earth Balance or ghee all over the inside of the squash. Sprinkle with salt and pepper to taste. Don't worry about the fat as most of it will steam off in the oven.


Place the delicata face down in a shallow casserole dish with a 1/2" of water. Place in the heated oven and bake until a fork can easily pierce the skin, about 30 to 40 minutes.


While the squash is baking, prepare the rice according to directions. If you are using a rice maker that takes almost an hour, you should start the rice before you make the squash. 

Crumble the saffron into the rice while bringing the water to a boil. If using a rice maker, just add the crumbled saffron to the water.

While the rice is cooking and the squash is baking, place the finely diced red bell pepper into a small saucepan with a small amount of water. Cover and steam until it starts to soften, about 5 minutes.

Add the can of spicy black beans and its liquid to the peppers and simmer, uncovered, until heated and most of the liquid evaporates.

Make sure the organic spicy black beans
come in a can with a non-BPA lining.

Place the four delicata halves on individual plates and fill each half with one quarter of the cooked saffron rice .


Spoon the black beans over the rice and serve.


Enjoy!